Results for Penetration Testing

winAUTOPWN V2.7 | Windows Interactive exploit framework Tool

Wednesday, September 21, 2011
winAUTOPWN is a simple tool which works on windows platform and is quick in systems vulnerability exploitation.This is tool which takes less information from your side and does more effective work.
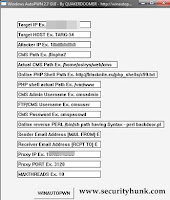
winAUTOPWN V2.7


Why you should use this tool?

1. It takes simple inputs like IpAddress,Hostname,CMS Path

2. It also does a smart multi-threaded port scan (1 to 65535).

3. Exploits written by other writers can be added to it to evoke a remote shell from target box.

4.It helps the attacker to check the no of exploits it has used on the target box.

In the new version this tool has added few extra features like
  • Commandline parameters for Reverse Shell URL 
  • Mail-to,mail-from(Email server exploit)
Download
winAUTOPWN V2.7 | Windows Interactive exploit framework Tool winAUTOPWN V2.7  | Windows Interactive exploit  framework Tool Reviewed by Satyajit (Admins,a.k.a Satosys) on Wednesday, September 21, 2011 Rating: 5

Katana | A portable multi-boot security suite

Wednesday, February 09, 2011
Katana a tool which holds over 100 applications under it which can be run a USB/flash drive.As the new v2 has come up with a major addition called "Forge",which helps in further addition of new applications to the booting list.
Katana security

>>>>>Learn how to use portable applicaions from your PC.

Portable Applications:

1.BackTrack
2.Computer Aided Investigative Environment(CAINE)
3.Ultimate Boot CD for Windows
4.Ophcrack Live

and many more......Find more portable applications here... :)

(Download)
Katana | A portable multi-boot security suite Katana | A portable multi-boot security suite Reviewed by Satyajit (Admins,a.k.a Satosys) on Wednesday, February 09, 2011 Rating: 5

New Inguma |A free Penetration and Vulnerability Research Toolkit

Monday, January 31, 2011
Inguma is a free penetration and vulnerability research tool kit written in python, recently the new version has been released after 3 years and with a very user friendly Graphical user interface.

1.Learn more about it here.

2.Visit there blog for more updates.

Download Inguma 0.2 :

1.Inguma-0.2.tar.gz

2.You can use it with Backtrack as it comes with it under Pentesting tools.
New Inguma |A free Penetration and Vulnerability Research Toolkit New Inguma |A free Penetration and Vulnerability Research Toolkit Reviewed by Satyajit (Admins,a.k.a Satosys) on Monday, January 31, 2011 Rating: 5

Fast-Track Tutorial for Beginners | Payload Generation

Friday, January 28, 2011
We discussed Metasploit framework in a post and today in this tutorial we will be discussing about Fast-Track which is very easy to use as compared to metasploit as we will see later in the discussion.Here we will discuss how to generate payload using Fast-track from its menu driven interface.

What is Fast-Track?
 It is an open-source project in python and brain child of David Kennedy to come in help during penetration testing with the blend of metasploit framework to make pen testing automated.It makes it very easy for pen testers to exploit the client side data ,improper patch management etc.It has dependencies on metasploit,SQLite,FreeTDS etc.It is advantageous as compared to metasploit beacuse of its very user friendly usage.

What is Payload?
It is actually the work of the exploit that is the result or effect.For example while using any exploit on a targeted box we may get the shell,VNC desktop or access to the files etc on the attacker box.

What is Shellcode?
It is the opcode(Operational code) that can be executed on the targeted box to get the command shell etc.It can be encoded to bypass antivirus detection.

Requirements:

1.Backtrack

2.Virtual environment software.(Vmware player/Virtual Box)

>> Learn how to boot Backtrack from USB
>> Learn how to use Virtual Environment

Procedure:

Step 1.
Boot backtrack and open a shell console and change the directory to " cd /pentest/exploits " and
type "python setup.py install" to check if fast-track has all dependancies install so that it will download from online as shown below.
Step 2.
Now type "python fask-track.py" inorder to select the desired interactive mode.Here I have selected the menu driven mode (./fast-track.py -i) as in this discussion we will be using that.
Step 3.
Now as I got the menu for fast-track usage in the screen, I selected no.6 that is "Payload Generator" as shown in the image below.
Step 4.
Now in this step we have to select the type of payload from the given menu,here I have selected "Reverse_Tcp Meterpreter" that is no.2 as shown in the image below.
Step 5.
Now we need to encode our payload inorder to bypass the AV ,here we have selected no.2 as shown in the image below.
Step 6.
Now we need to enter the host IpAddress and the desired port.Then select the form of payload that is "executable" or "shellcode" as shown in the image below.
Step 7.
As you can see the payload is being saved in .txt format so,we can get the shellcode from it.If we would have choosen the "executable" format then a .exe file would have been created.

Step 8.
If the .exe file is run in the victim's box and we have setup a listener then we can get the meterpreter seesion on our desktop as shown in the image below.
 In the next post we will see how we can use the shellcode generated to make an executable.

If you find this post useful then do drop your comments it will be appreciated... :)
Fast-Track Tutorial for Beginners | Payload Generation Fast-Track Tutorial for Beginners | Payload Generation Reviewed by Satyajit (Admins,a.k.a Satosys) on Friday, January 28, 2011 Rating: 5

How to boot Backtrack from USB?

Friday, December 31, 2010
I am sure that many of you must have heard of Backtrack and its functionality.So I will not go in detail into what is back track but here I will tell you how you can use it from your USB.
What is Backtrack?
It is a Linux distribution and unix like OS made for pentesting and forensic analysis.It contains all the tools that an elite or a noob security and hacking enthusiast may dream of.

You can burn the .iso file of it to a DVD and boot.But here we will see how we can boot it from an USB.

Requirements:

1.Backtrack .iso file(Download)

2.Unetbootin.(Download)

3.HP Usb Disk Storage Format Tool.(Download)

4.USB (at least 2GB)

Procedure:

Step 1.
First format the USB with the "HP Usb Disk Storage Format Tool" not with the default one.

Step 2.
Now open Unetbootin and select Backtrack from the select distribution from the drop down menu and then select the version as shown in the image below.
Step 3.
Now select the disk image and follow as shown in the image below.Do check if the correct drive is being selected.
Step 4.
Now wait until all the files are being extracted and finish.
Step 5.
Now plugin the USB and reboot your box and press F12 or go to the boot menu and boot from the usb(primary) then follow the onscreen instructions.

If you find this post useful then do drop a comment it will be appreciated.... :)
How to boot Backtrack from USB? How to boot Backtrack from USB? Reviewed by Satyajit (Admins,a.k.a Satosys) on Friday, December 31, 2010 Rating: 5

Comments on blogs and its Security Threats

Wednesday, December 29, 2010
Well!!! comments are indeed a very vital and encouraging factor for each and every blogger.We also comment on blogs/sites of our niche and it is also recommended to comment on atleast 10-12 blogs/sites each day.But while commenting we tend to forget the security threats we may encounter while commenting on a site or blog.A simple comment that you drop on a blog/site can endup in compromising your box.So,in this post I will try to bring out the security threats you may encounter while commenting on a blog/site.
Nowadays almost all web pages have their own Ipaddress tracking mechanism or any third party tracking mechanism installed by which they can track the visitors.

Suppose that you comment on a blog/site with your naked Ipaddress(without hiding or masking) then it get logged with the administrator along with the OS you are using and the browser version and many more.These facts when exposed to someone can certainly be very risky and dangerous.The attacker may use the following steps to get into your box

1.FootPrinting: Gaining necessary information about the box

2.Port Scanning: Scanning for the open ports.

3.Banner Grabbing: Get the version about a desired service running on the box.

4.Vulnerability search: Search an exploit for the a particular version of a desired service.

5.Use exploit to penetrate: Use the exploit to get in the box and own it.

Suppose you are commenting on a Wordpress blog see what information the admin logs about you,as shown in the screenshot below.
(WordPress Account screenshot)

In the above screenshot you can see the admin gets your browser details along with your Ipaddress.

Similar if you are commenting on a Blogger blog with a third party tracking tool installed then see the below screenshot below.
(Blogger third party tracking Tool)

Suppose the admin have your Ipaddress he/she can follow the above mentioned steps,below I have shown only the portscanning with Nmap and see how it reveals the opened ports on the target.
(Nmap Screenshot:Port Scanning)

Countermeasures:
 So I recommend while commenting on any webpage do use a VPN or Proxy(Socks is good) to mask your real Ipaddress.
Comments on blogs and its Security Threats Comments on blogs and its Security Threats Reviewed by Satyajit (Admins,a.k.a Satosys) on Wednesday, December 29, 2010 Rating: 5

How to create Virtual Environment using Virtualbox.

Thursday, December 02, 2010
There are many occasions where we will need to have several operating systems in our computer. Think that you’re a software developer and now you need to test your software under different platforms! Or, you need to try out several operating systems to review about them or to pick the best OS for your machine! Or suppose you download a file from torrent or other external link and don’t trust that file then you can run it in your virtualbox to notice its behavior and save your Host PC from getting infected.
*But the problem is what is the easiest method to have several operating systems in your PC? Install them in your hard drive and mess things up when you want to remove them? Actually, there’s a better way to solve this problem.

What is a Virtual Environment?

"Here the programs are run in an isolated OS on a virtual hard disk as shown in the image below.The program do not have physical access to the host OS. Refer the image below to understand the concept."


Do you know that we can run several operating systems right from your desktop? Well, you can run several virtual machines under one OS and remove them gracefully without harming your system

*VirtualBox is one of the best free applications which will allow you to easily install and manage several virtual machines.
 *Virtual box is a great asset a computer security professional, hackers, penetration testers.Using it one can create a pentesting lab to work on with out spending a buck from the pocket. So, today we are going to see how to install Ubuntu inside Windows as a virtual machine!

Requirement :

1.You need to download and install VirtualBox (Download)

2.Must have a RAM of atleast 1GB  for proper running.

3. Installation CD or .Iso file of any desired OS of your choice.(As here is Ubuntu.iso)

Procedure:

Step 1: After you download and install Virtual Box, open it and click on “New” as shown in the image :

Step 2: In the next window, click on “Next”. After that give a name for your Virtual Machine. For “Operating System” select “Linux”. For the version select “Ubuntu” and click “Next”

Step 3: Next set the amount of memory for the virtual machine and click “Next” (Do not give too much; keep some to your own system. Do not go to the red colored area.) In my system, I have 4 GB of memory, so I gave 1 GB for my virtual machine. The memory amount changes from OS to OS. For windows, you need more memory than Linux, so choose it carefully!

Step 4: In the next window select “Boot Hard Disk” (By default it’s selected) and select “Create New Hard Disk”. Now click “Next”.
 *After that, the Create New Virtual Disk Wizard will start. Click “Next” in the Welcome screen.
Now, select “Fixed Size Storage” and click “Next”
 *Next, give the size of the disk you want. For Ubuntu, the default size they offer (8 GB) is more than enough. So, keep it like that and click Next. After that, click on Finish to create the virtual disk. This will create an 8 GB virtual disk on your machine.

Step 5: At the end, it will give you a summary screen. Click “Finish” to continue
Now, in the main windows, select the OS that you have just created and click on “Start”

Step 6: If you see any information box, Just press “OK”

*Now that you’re running your virtual machine for the 1st time, they will run a wizard called “First Run Wizard” which will help you to select the installation media of your guest OS. Click on “Next” in the first screen.
*Next, insert the installation CD of your OS (in this case its Ubuntu) to your CD ROM. Now select your CD drive in the “Media Source” Field. But if you want to install form an image. Click on the little folder icon next to the media source filed. Next, in the “Virtual Media Manager” Window, click on “Add” and select your image file. After you have added the image, click on “Select”

After you’re done adding the image or setting up the CD drive. Click on “Next”. Finally, click “Finish”.

Now it will load the installation CD you have provided and you can continue with installing your OS! So, what do you think? Isn’t it a piece of cake? How many operating systems are you planning to install? Please feel free to share your ideas with us!

About Author:
This is a Guest post by Pubudu Kodikara who is a writer at Tech Hamlet, a state of the art tech blog which aims at educating people about the latest technology,news,hacks
tutorials,tricks and many more. 

"If you find this post useful and informative do post your comment and share it."
How to create Virtual Environment using Virtualbox. How to create Virtual Environment using Virtualbox. Reviewed by Satyajit (Admins,a.k.a Satosys) on Thursday, December 02, 2010 Rating: 5

Metasploit | A guide for beginners and newbies.

Saturday, November 06, 2010
If you have interest in hacking then I feel metasploit framework platfrom is very essential to know and implement.It is used by security reseachers,Pentesters,Hackers,script kiddes etc.So,in this tutorial I will discuss few basics of metasploit and its architecture.So lets start....
I recommend readers if they abide by the blog's Disclaimer then they can proceed reading this post otherwise leave this page immediately.
Metasploit

What is metasploit?

It is an exploitation framework written in ruby language used for devloping and executing exploits on a remote host after assessing the vulnerability.It has a wide range of pre developed exploits and few useful applications like "nmap" attached with it.It was primarily developed for penetration testing but now it has come out to be must needed tool for hackers.

Note:All the screen shots in this post are from Windows OS.

Architecture:
Image Credit:HD Moore

Basic Terms:

1.Exploits:
It is similar to a vehicle in real life that helps in entering or penetrating to a system because of any vulnerability or any flaw in the system.

2.Payload:
Its specifies the work of the exploit

3.Auxillary:
These are few other applications combined with the framework like sniffers,enumeration tool.

4.Meterpreter:
It is a payload that is injected into a process of an exploited system where no additional process is created in the memory and later it can be migrated to any desired process using PID(Process ID.)

5.Encoders:
Exploits are sometimes detected by anti-virus so these encoders can be used to make the exploits undetectable and manipulate the code.

6.Nops:
Known as no operation generators are helpful in letting the exploit remain undetected from IDS.


7.Plugins:
The extend the functionality of the cosole.

Basic Commands:

1.help:
As the name signifies it will show some commands for reference.

2.search:
If you want to search an exploit and donot know the excat name then.For example search windows as shown in the image below.

3.use:
After the desired exploit has been sorted out then use this command to select he particular exploit as shown in the image below.


4.set:
If you want to use a particular option once then this command is used as shown in the image below.

5.show options:
If this command is used then it will show the options of the exploit.What port to be used etc...

6.setg:
It is same as "set" but the "g" stands for global so if you want to use a particular option for the complete session then use this command.

7.show :
Only "show" command will display all the exploits,payload and auxillaries at a time on the screen but if used as "show payloads" etc will show only the payloads as shown in the image below.


8.info :
It displays the needed information about an exploit or payload.

9.exploit/run:
After every thing is set this command is used to run the exploit.

10.sessions:session -i,session -i <1,2,3...id>:
After the exploit is succesful then to see the sessions this command is used and then the ID is used to select a specific one.

11.ps:
Suppose a meterpreter session is running successfully then "Ps" will display the processes running in the exploited system.

12.migrate :
It somtimes happens that the process to which the meterpreter is being injected is a temporary process so here the migrate command can be used to tranfer the meterpreter to some other process by specifing the process id.

You can setup a "Pentesting Environment" at your home using Virtual environment,find out here.

For more information on Metasploit visit here.

"If you find this post useful and informative do post your comment and share it."
Metasploit | A guide for beginners and newbies. Metasploit | A guide for beginners and newbies. Reviewed by Satyajit (Admins,a.k.a Satosys) on Saturday, November 06, 2010 Rating: 5

How to setup a PenTesting Lab/Environment using Virtual Box.

Friday, October 08, 2010
Well!! instead of spending money on setting up a Pen-Testing lab its easy and cost effective to use virtual environment for this purpose.In this tutorial I will show you how you can setup a Pen-Testing lab without losing a single buck from your pocket.

What is Penetration Testing(a.k.a Pen Testing)?

This is a process by which the security and the vulnerability level of the target system is estimated.It is of three types

1.White Box Testing :Here the tester has complete details about the configuration of the box.

2.Grey Box Testing :Here the tester has partial details about the configuration of the box.

3.Black Box Testing : Here the tester has no details about the configuration of the box.

How to setup a Pen Testing Lab using Virtual Box.

I will proceed keeping in mind that you know how to install a Virtual box.

Requirements:

1.2GB  RAM will do great.

2.Virtual Box(Download)

3.Backtrack .iso (Download) and a Windows OS .iso will do.

* Having setup Virtual box in your host PC here my host is "Ubuntu" you can also use windows.Make two virtual machine in your virtual box one loaded with "Backtrack"(attacker) and another with "Windows(vulnerable)"(target).

 *Now the main step is that to connect the two virtual machine on the same network.You should use the "Internal Network" in the network settings on both so that they will not be connected to the host in any way,actually it is safer if your host is connected to any external network.

*Now your pen testing environment is ready.Take a look at mine at the image below.
 This scenario comes very handy if you are using metasploit  or any pentesting tool for the first time because here you can ensure maximum safety and do loads of practice before you hop over to real life scenario

Good Luck :)

I hope you will find this post useful....if so,so drop your comments it will be appreciated. :)
How to setup a PenTesting Lab/Environment using Virtual Box. How to setup a PenTesting Lab/Environment  using Virtual Box. Reviewed by Satyajit (Admins,a.k.a Satosys) on Friday, October 08, 2010 Rating: 5

Hacking and Security Tools for Beginners and Elite - Complete Tool Kit

Saturday, September 25, 2010
Here is this post I have listed out few of the frequently and widely used Tools used by Hackers of all levels.But one thing i would like to mention is that "Hackers make tool but tool do not make Hackers"If you depend more on tools then you cannot evolve as a hacker rather you will be surrounded by tools and dependent on them.

1.Password Cracking Tools:

a) John the ripper-http://www.openwall.com/john/

b) THC hydra-http://www.thc.org/thc-hydra/

c) Brutus-http://www.hoobie.net/brutus/

d) L0PhtCrack-http://www.l0phtcrack.com/

e) SAMInside-http://insidepro.com

f) Cain and abel-http://www.oxid.it/cain.html

g) Pwdump-http://www.foofus.net/fizzgig/pwdump/

2.Pentesting Tools:

a) Metasploit framework- http://www.metasploit.com/

b) Canvas- http://www.immunitysec.com/products-canvas.shtml

3.Sql injector Tools:

a) Sqlihelper

b) Havij

c) SQL Exploiter

4.Website Vulnerability Scanner:

a) Acunetix- http://www.acunetix.com/

b) Rational appscan- http://www.ibm.com/software/awdtools/appscan/

5.Vulnerability Scanner:

a) Nessus-http://www.nessus.org/

b) Retina-http://www.eeye.com/html/Products/Retina/index.html

c) Sara-http://www-arc.com/sara/

6.Port Scanner:

a) Nmap- http://nmap.org/

b) Angry Ip scanner- http://www.angryziber.com/ipscan/

c) Super Scan- http://www.foundstone.com/us/resources/proddesc/superscan.htm

7.Intrusion detection Tools:

a) Snort-http://www.snort.org/

b) Sguil-http://sguil.sourceforge.net/

8.Live CDs:

a) Ophcrack- http://ophcrack.sourceforge.net/

b) Backtrack- http://www.backtrack-linux.org/

c) Hiren’s boot cd- http://www.hiren.info/pages/bootcd

d) Ultimate boot cd- http://www.ultimatebootcd.com/


9.Wireless Tools:

a) Wireshark- http://www.wireshark.org/

b) Kismet-http://www.kismetwireless.net/

c) Aircrack- http://www.aircrack-ng.org/

d) Netstumbler- http://www.stumbler.net/

10.Steganography Tools:

A list of  few "STEGANOGRAPHY TOOLS " free to DOWNLOAD.

11.IP Tracing Tools:

a) Neo Trace- http://www.networkingfiles.com/neotrace/

b) Visual Trace-http://www.visualiptrace.com

12.Software Cracking Tools:

a) Debuggers-OllyDbg,WinDbg

b) Unpackers-QUnpack

c) DisAssemblers-WIN32Dasm

d) Decompilers-Boomerang,Mocha,JAD

e) Hex Editors-Hexworkshop,Hview, HxDSetupEN

A list of few "REVERSE ENGINEERING" tools free to Download.

13.Virtual Enviroment Software:

a) Vmware- http://www.vmware.com/

b) Virtual box- http://www.virtualbox.org/

c) Sandboxie- http://www.sandboxie.com/
Hacking and Security Tools for Beginners and Elite - Complete Tool Kit Hacking and Security Tools for Beginners and Elite - Complete Tool  Kit Reviewed by Satyajit (Admins,a.k.a Satosys) on Saturday, September 25, 2010 Rating: 5
Powered by Blogger.