Results for Administrator

10 Steps to take after Cyber Security Breach 2019

Thursday, October 24, 2019
While a major part of preventing all massive potential data intrusion damage or cyber security breaches lies in the preventative measures of secure code, updated security software, use of frequently updated applications and strong passwords for all access points to your data; sometimes cyber security breaches happen no matter how well you have protected yourself. When this happens, prevention no longer matters for the moment and purely defensive and sanitary measures are your best friend.

Top 10 after do of a cyber breach


Definition of Data Breach.

In today's world we have huge amount of data available and that is a lot of information.

Having said that the data can be categorized broadly into private , public etc. These groups can be sub divided further into financial,medical,educations,military intelligence and so on.

Any kind of data that comes into the category that is restricted to public access and is to some extent confidential is  called as private data.These are the kind of data that are commonly hacked by hackers.When these private and confidential data are either made public or accessed by someone who is not authorized for it then this situation or scenario is called as data breach.

Example of social security identity theft and medical data theft is also of high concern.If you remember the Office TV show dialogue,"Identity theft is not joke,Jim".This truly hold good and should taken very seriously.

Example:data breach at experian

Now let’s cover some of these, as applied to assorted systems, including computers, hosting servers and your internal networks.At the end of this post we will also see the recent security breaches of 2019.
1.Make Sure you have been Hacked

Not all strange system behavior is a sign of third party or malware intrusion. Sometimes the complex systems we operate go haywire because of changes we ourselves have made to them without being aware of the consequences.

If your website, computer or network is behaving strangely, not loading properly or giving you blank displays where data or a visual interface should be visible, first think back to any recent changes you might have made that could be responsible for the differences.

In a website hosting system, for example, changing so much as a single parameter within a site’s MySQL database template can lead to a completely downed website even though all the internal data is perfectly safe.

So in other words be very sure that there is cyber security breach and need to prompt enough to take the actions, a minute late in this may result in serious repercussions.

2.Speak to your Support Team

As a follow up to step one above and as a part of general policy, you should speak to your technical support team as soon as you have noticed strange things about your system. If you’re a website owner, this could be the people who manage your IT and hosting servers and if you’re the owner of a business or organizational network, this could be your IT support staff.
They can not only tell you about any changes they may have done to provoke a system failure, they can also help you investigate the wider scope of the intrusion you may be suffering.

3.Image your Servers or Drive

Imaging software for computer hard drives and the same sort of software for servers should always be close at hand. In case of a breach, before proceeding with cleanup and removal of all malicious factors, you should first image your drives or servers immediately in the condition they have at the time of their hack.

This will preserve a large body of evidence which can later be examined through digital forensics techniques, and this evidence vitally needs to be preserved so that you can formulate a better future intrusion response. Knowing if you were the victim of a genuine virus, entry by a human hacker who’s been modifying your code or something as simple as some spyware is crucial.

4. Disconnect from the Web (if possible)

As soon as you have imaged your servers, hard drives and all data or code collections, you should immediately disconnect your servers or computers from the wider web if at all possible.

This may cause chaos and disruptions for clients if you’re running a business website, but as a preventative step it’s vital. By keeping your machines and servers connected, you’re allowing the malware or human intruders who have breached them to continue maintaining malicious access, keep stealing data or causing further damage.

Unless you’re running security scans that require a web connection to work, your systems should be offline while you recover.

5. Change all Passwords

In addition to imaging of all data storage media and disconnection from external access, you should also be moving quickly to change all of your access passwords. They may have been the cause of your security breach and by leaving them as they are, you’re inviting future attacks even after you repair and reinstall everything.

Your machine itself, your hosting server access, your MySQL databases and your FTP should all have their passwords and the passwords of any sub-accounts on them reset immediately.

6. Perform Security Scans

Antivirus software, anti-malware programs and network intrusion protection software should all be tools that you keep close at hand for intrusion incidents. Once your intrusion has been detected and the above steps taken, perform scans that cover all the major bases against malware, spyware, intruders and scripting attacks.

7.Remove all Malicious Files and Code

Through the assistance of your IT support team, your service providers and the security software you have been running, you can start slowly identifying and destroying all the malicious code you find on your network, servers or computer itself. This can be a tedious process and if you’re not sure that you have successfully removed everything, you probably need to do a full re-install.

8. Back up Everything

Back up all of your valuable data as soon as possible after a data breach. You may have already performed a full scale imaging process on your entire servers or drives but specific section backups of key databases and data volumes are also a good idea because they allow you to compartmentalize valuable information for later analysis through digital forensics.

9. Re-install as much as Necessary

If the breach was very severe and especially if the breach affected a lot of data or code, you might have to perform a full scale re-installation of all your software. In a computer, this will require you to format your entire hard drive and re-install your operating system.

On your website hosting servers, you’ll almost certainly need to re-install all o your database management software, LAMP (Linux, Apache, MySQL and PHP) applications along with any other third party software you were running for your website.

Always re-install to the newest versions of whatever software you need to replace.

10. Document Everything

Finally, document everything. Document all of the steps you took, the processes you followed and the files you erased, re-installed and used to clean your machine. Documentation is useful for future digital forensics (if needed) and it preserves a chain of evidence that can be used as a future prevention reference.

11.Report Identity theft to Police.
In case of any identity theft , the first thing we should do is freeze all the confidential information and if needed and possible  reset the information.Then reporting identity theft to Police is of foremost importance so that if in case those confidential information are misused then we have a police report in place.

10 Steps to take after Cyber Security Breach 2019 10 Steps to take after Cyber Security Breach 2019 Reviewed by Satyajit (Admins,a.k.a Satosys) on Thursday, October 24, 2019 Rating: 5

Ramnit : Worm that loves Facebook

Friday, January 20, 2012
ramnit malware
 "Ramnit"  the worm with multifaceted spreading capabilities,first detected on 2010 for infecting local systems. Now the hackers behind it have redesigned it into a more advanced kind of worm.The worm has already stolen 45000 facebook credentials and still on move.


It is also confirmed that this worm is able to bypass the two level authentication used by banking organizations and online money transfer.Below I have taken the snapshot of the code of the worm that was detected in 2010.
 It comes from online malicious sources and   creates infected .html files through that it infects the executable and .dll files. As,depicted in the video below.


But as the worm has spread its root to financial and social media so it a big concern.Users are advised to change there credentials in every 14 days.
Ramnit : Worm that loves Facebook Ramnit : Worm that loves Facebook Reviewed by Satyajit (Admins,a.k.a Satosys) on Friday, January 20, 2012 Rating: 5

What is Http Tunneling | Bypass firewall and proxy

Friday, January 14, 2011
In most of the institutions and companies due to security risk many restrictions are being imposed on network like blocked ports etc.There are many ports that are blocked for outbound connection and few ports for http connection are opened so that people working over there can access there email etc.As the http port outbound is opened so it can be used for http tunnel to access restricted applications like IM etc.In this post we will see how we can do that and also see the available http tunneling Software packages.

What is Http Tunnel?

It is a technique in which the communications that are restricted in the network are bundled within the http protocol and allowed to communicate.The user uses a http tunnel software with client-server but to use it with administrative privileges.

How it works?
The user need a http_Tunnel-client and a server other than the original client-server.What happens that when the original_client decides to connect to a desire server then it sends its request through the httptunnel_client to the httptunnel_server then to the original_server as shown in the figure below.
 Actually the restricted application that is the client(in the figure) sends a request other than http through the http tunnel_client bundle inside the http request.Then the http tunnel_server receives its unwrap,decrypt,uncompressed it and forward it to the original server in the same way the data is transferred.The main concept over here is that there is middle (client-server) other than the original client-server.

Advantages:
1.Undo restrictions on applications like instant messengers etc

2.Helpful in accessing restricted pages and sites.

3.May be helpful in bypassing firewall  restriction but not in an extensive manner.

Lets see how we can use http tunneling.

Http Tunneling Software:

1.Http-Tunnel(Download)

2.HttpTunnel(Download)

3.Hopster(Download)

4.Super Network Tunnel(Download)

5.HttpTunnel(Linux)(Download)

Requrirements:

1.Http Tunneling Software(Client-server)

2.Administrative Previlage.

Procedure:

Step 1.
Here I have used the soft named HttpTunnel for tunneling with both server and client.Download and install it.

Step 2.
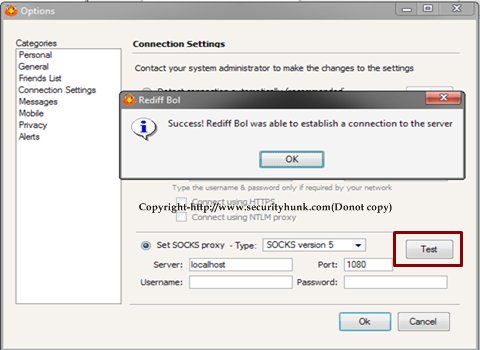
Now click on the client and server part of it and you can use port mapping or socks5 for connecting thought the client.
Step 3.
Here I have used Rediff bol as a restricted application and socks5 for connecting.As you set the settings click on "Test" to see if it could connect ot the server,if it is successful then proceed as shown below.
Http tunnel in the network can be still detected by analyzing the data and packets in the network.On more thing is that http connections last for less interval of time but since in http tunnel with tcp protocol bundled in side it may last for extended period of time so it may create a suspicion in the mind of the network administrator.
What is Http Tunneling | Bypass firewall and proxy What is Http Tunneling | Bypass firewall and proxy Reviewed by Satyajit (Admins,a.k.a Satosys) on Friday, January 14, 2011 Rating: 5

Reduce spam by using DKIM authentication in Google Apps

Monday, January 10, 2011
Spam is a common word these days as our mailbox is flooded with these stuffs every day.Spammers use these trick to promote their product and sometimes compromise an account.Gmail is using the DKIM authentication in the email header to authenticate a mail from a real sender.Now the google has again come up with a new step to fight against the spam by introducing DKIM authentication for its google apps users that too free of cost and with manual enability.

Here in this post we will discuss how to enable "DKIM authentication" in Google Apps.

What is DKIM Authenticaion?

Domain key identified mail(DKIM) is a mechanism in which an email header is authenticated with a digital signature so that it cannot be tampered in the path.To know more on it read my post on it.

There are three major steps required to enable DKIM Authentication:

    *Generate domain key in Google Apps

    *Add public domain key to the DNS records of domain.

    * Turn on DKIM authentication.

Generate Domain key in Google Apps:

Step 1.
Login in to the Control panel of Google Apps and in the "Advanced tools" scroll down to "Authenticate email" as shown in the image below.
 Step 2.
Click on "step up email authentication" then enter the desired "prefix selector" and click generate as shown in the image below.
Step 3.
After you click on the "Generate" button in the previous step a "DNS hostname"  and "TXT record value" will be created as shown in the image below.But donot click on the "Start Authentication" button,as it will be clicked after finishing all the left steps.

Add public domain key to the DNS records of domain.

Step 1.
Now Login to the admininstrator account of the Domain service provider.


Step 2.
Now in the DNS record page add a TXT record with the value as shown in the image above and save it.

Turn on DKIM authentication:

Now having completed all the steps now click on the "Start Authentication" button shown above.

If you find this post interesting then do drop your comment,it will be appreciated... :)
Reduce spam by using DKIM authentication in Google Apps Reduce spam by using DKIM authentication in Google Apps Reviewed by Satyajit (Admins,a.k.a Satosys) on Monday, January 10, 2011 Rating: 5

Prevent access to Google Apps and reset sign-in cookies.

Sunday, January 02, 2011
Google Apps has indeed added a bit of ease to most of the people those who are on move,they can access there favourite google service from anywhere any time if they have access to internet.Suppose the device from where they are accessing the Google Apps account get stolen then the person possessing the device can open their account using the session cookies present in the browser without even knowing the authentication credentials(username & password).

Google really thinks about its user's security so,it has added a feature to reset the session sign-in cookies for a
particular user and that user needs new authentication to sign-in.

Note:This feature is only available to premier users(paid user) of the account

Step 1.
Login(As Administrator) in to the control panel of your Google Apps account and reach the dashboard as shown below.The control panel can be accessed from the link below.
( http://www.google.com/a/your-domain_name.com )

Step 2.
To avail this feature you need to have the "Next generation control panel".To do this follow the instructions shown in the image below.
Step 3.
Now click on the "Organisation and users" tab and click on the desired username for whom you want to reset the sign-in cookies as shown in the image below.
Step 4.
Now "User information" open up and you can see the "Reset sign-in cookies" option in the password section.Just click on it then the user has to re-authenticate again when they start a new browser session.

To remote wipe a mobile device visit here.
Prevent access to Google Apps and reset sign-in cookies. Prevent access to Google Apps and reset sign-in cookies. Reviewed by Satyajit (Admins,a.k.a Satosys) on Sunday, January 02, 2011 Rating: 5

Comments on blogs and its Security Threats

Wednesday, December 29, 2010
Well!!! comments are indeed a very vital and encouraging factor for each and every blogger.We also comment on blogs/sites of our niche and it is also recommended to comment on atleast 10-12 blogs/sites each day.But while commenting we tend to forget the security threats we may encounter while commenting on a site or blog.A simple comment that you drop on a blog/site can endup in compromising your box.So,in this post I will try to bring out the security threats you may encounter while commenting on a blog/site.
Nowadays almost all web pages have their own Ipaddress tracking mechanism or any third party tracking mechanism installed by which they can track the visitors.

Suppose that you comment on a blog/site with your naked Ipaddress(without hiding or masking) then it get logged with the administrator along with the OS you are using and the browser version and many more.These facts when exposed to someone can certainly be very risky and dangerous.The attacker may use the following steps to get into your box

1.FootPrinting: Gaining necessary information about the box

2.Port Scanning: Scanning for the open ports.

3.Banner Grabbing: Get the version about a desired service running on the box.

4.Vulnerability search: Search an exploit for the a particular version of a desired service.

5.Use exploit to penetrate: Use the exploit to get in the box and own it.

Suppose you are commenting on a Wordpress blog see what information the admin logs about you,as shown in the screenshot below.
(WordPress Account screenshot)

In the above screenshot you can see the admin gets your browser details along with your Ipaddress.

Similar if you are commenting on a Blogger blog with a third party tracking tool installed then see the below screenshot below.
(Blogger third party tracking Tool)

Suppose the admin have your Ipaddress he/she can follow the above mentioned steps,below I have shown only the portscanning with Nmap and see how it reveals the opened ports on the target.
(Nmap Screenshot:Port Scanning)

Countermeasures:
 So I recommend while commenting on any webpage do use a VPN or Proxy(Socks is good) to mask your real Ipaddress.
Comments on blogs and its Security Threats Comments on blogs and its Security Threats Reviewed by Satyajit (Admins,a.k.a Satosys) on Wednesday, December 29, 2010 Rating: 5

Prefetcher | What is it? and Forensic Analysis.

Tuesday, November 09, 2010
It is indeed very vital for a computer forensic analyst to get the details of the application we launch,the timestamp and the path.Here in this post we will discuss how to can find that and the tools needed for this...so lets start.......
Prefetcher
What is a Prefetcher?

It is a feature added to Ms Windows Xp to speed up or improve boot time and the loading time of applications we run on a windows box.During booting a large no of files are loaded into the memory and there by a specific amount of time is consumed in this process.But the prefetcher keeps a track of the files and the data that are loaded during boot time and make a trace of it.So when again the system is booted then this information stored by the prefetch can be used and this can certainly reduce the boot time...the same thing happens with the application that we launch after the system has been logged in.

Where we can find this prefetch?

1.It is stored in the a folder named "Prefetch" in the system root "%SYSTEMROOT%\Prefetch",in my testing system it is found in "C:\WINDOWS\Prefetch"

2.It can be enabled by changing the registry value at as shown in the image below.(By default it is enabled.)

"HKEY_LOCAL_MACHINE\SYSTEM\CurrentControlSet\Control\Session Manager\Memory Management\PrefetchParameters"


Information stored in Prefetch file:

*When a application is loaded or launched then a prefetch file is created with .pf extension.Suppose an application called "XYZ.exe" is launched then a prefetch file is created in the "Prefetch" directory and named is in a format as "XYZ.EXE-0870E38D.pf" as shown in the image below.

*Above the hash file contains the path of the application.If the same application is launched from different location then also two different files are created.

*The Prefetch contains information like:

-Name of the application

-The no.of times the application is launched.

-Volume serial number

-Dll used by the application.

-Serial numbers of external thumb drives.

-MD5 hash

-Some binary data and some unicode information

-Volume information

-Application path

-Timestamp of volume creation.

Forensic view of Prefetch file:

If some unknown application say a malware is launched from the hard disk or from external drive then the launch time its path can be found out.If the malware is being deleted still then its leaves its traces in the prefetch which can come handy to a forensic analyst.


How to get the information:

Once you browse to the "Prefetch" folder then u can open the .pf file using a hex editor but it may be bit difficult and confusing.So here I will show you few tools which you can use to retrieve the information.

1.Windows File Analyser.(Download)

2.Win Prefetch View.(Download)

3.Prefetch Parser.(Download)


Here I have show you the screen shots of "Win Prefetch View" , here you cannot find all the information mentioned above but the others tools that I mentioned above can surely retrieve that so do give it a try.

"If you find this post useful and informative do post your comment and share it."
Prefetcher | What is it? and Forensic Analysis. Prefetcher | What is it? and Forensic Analysis. Reviewed by Satyajit (Admins,a.k.a Satosys) on Tuesday, November 09, 2010 Rating: 5

How to use John the Ripper Tutorial and Pwdump7

Wednesday, October 20, 2010
In Microsoft Windows user account password and information are stored in a file called SAM. The windows SAM file location is “%systemroot%\system32\config” and also a backup copy of the file is also stored in ”%systemroot%\repair”.Here in this post we will see how to use John the Ripper for windows to extract the information.

As part of Windows 10 Password hack, we will be using brute force password cracker that is John the Ripper and Pwdump7.In this John the Ripper tutorial we will keep things simple for understanding and keeping in mind if any beginner is following it.
SAM-Password-cracking

In Windows 10 and earlier versions till Windows SP3 the SAM file is by default locked with syskey enabled so we cannot open it as such and view its content so here in this post, I will show you how we can crack it and retrieve the hash.

You may be wondering what does SAM stand for?

It is can be expanded as Security Accounts Manager, it stores the user credentials information.

Requirements:

1. Pwdump7: (Download)

2.John the ripper Download

Procedure:

Step 1. You need to have the administrative privilege then open up command prompt window, using the command prompt go to the directory where pwdump7 is present and follow the on-screen information as shown below.
SAM-Password-cracking

Step 2. After all the hashes are being displayed on the command prompt screen right click on the title bar copy it then pastes and saves it in a text file.First right click and mark the screen before copying. Here I have saved it as pw-hash.txt
SAM-Password-cracking

Step 3.Having downloaded John the ripper for windows browse into John’s root directory and use the command as shown in the image below.
SAM-Password-cracking

Step 4.The command we have used above is “C:\JOHN\RUN>john-386 C:/pw-hash.txt –users=Administrator”, the format of the command is “john-386 [Hash file path] –users=[Username]”.Here the hash file path is “C:/pw-hash.txt” and the username is “Administrator”, by using the above command then the John will search for the password of Administrator.

You can also use “C:\JOHN\RUN>john-386 C:/pw-hash.txt” so that John will search for the password of all the usernames available.

If you have a John the ripper wordlist then you can use the wordlist mode as well.

john --wordlist=password.txt pw-hash.txt

I think from this post we were able to understand how to use John the Ripper for windows Tutorial and Pwdump7 .

If you find this post useful then do drop a comment it will be appreciated.
How to use John the Ripper Tutorial and Pwdump7 How to use John the Ripper Tutorial and Pwdump7 Reviewed by Satyajit (Admins,a.k.a Satosys) on Wednesday, October 20, 2010 Rating: 5

Few Security Tips for Windows user.

Saturday, September 11, 2010
Well!! security is the buzzing word these days because of new form of  attacks and threats.These attacks are mainly targeted to Windows user compared to Linux or other OS in the series.One thing I must say that 90% of the victims fall in the trap of attackers due to there lack of alertness and there own flaws.Lets see how we can avoid these types of attacks if not completely but to some extent.

1.I would recommend that always update your OS and software that are installed if the update is available.If  you do not do that then there may be some vulnerability in your present OS or software and the attacker can find that by Fingerprinting and Banner grabbing and plant an exploit for it.

2.Attacker  install R.A.T or Keylogger on a remote PC by tricking the user by social engineering.So I will recommend you to always look out for the extension of the file before clicking on it.It may sometime be the case that the file sent to you may look like an image but having an extension of an executable format(.exe).How to tackle it? Read here.

3.Always use an updated AntiVirus,Anti-Logger,Link Checker,Site Advisor and keep with you a latest rescue disk of an Antivirus.
  • Anti-logger:I would recommend  Zemana antilogger compared to KeyScrambler because the later can protect your keystrokes from the browser window but Zemana has anti-keylogger,anti-screen logger,anti-webcam logger,anti-clipboard logger.
  • Link Checker:You can use Dr.Web link checker,by this you can scan a file before downloading it.Just right click on the required link and click on the Dr.web icon.It is also available as a Firefox addon.
  • Site Advisor:Here you have two options,you can use Macfee site advisor or WOT both can be integrated with your browser.
  • Rescue Disk:I would recommend using Kaspersky's.Download the .iso file and burn it into a Cd and can use it.
4.If  sometime you have left your PC  "ON"  in your absence then it may be possible that someone may have plugged in an USB (Pendirve) and done some data transfer or some unethical activity.Read here how to find out this.

5.Most of the time attackers bind a file with another file inorder to trick the victim.Learn how to find this,Read here.

6.A simple Autorun.inf can even crash your PC.Learn how to avoid it,Read here.

7.Have you ever given a thought that someone may have logged into your box in your absence.Learn how to find out,Read here.

8.Always look out for print and file sharing option before using internet.I would recommend to disable it as it can open gateway for netbios attack.Follow the path  Control panel > Network Connection > Right click on the desired icon >Networking Tab > Disable the print & file sharing option.

9.Always use a strong password to your administration account,try to access internet form a limited user account rather than from administration account.

10.Use a good firewall rather than using the default windows firewall,you can choose from Comodo or Zone Alarm but I would recommend using Zone Alarm even if it is the free version.

I must say even if you follow all these tips still then you cannot make your PC 100% hack proof because nothing is non-hackable.I recommend to follow these tips so that you can avoid certain attacks or threats to some extent.

If you find these tips helpful and read worthy then do drop a comment,it will be appreciated.
Few Security Tips for Windows user. Few Security Tips for Windows user. Reviewed by Satyajit (Admins,a.k.a Satosys) on Saturday, September 11, 2010 Rating: 5

Autorun.inf :Removal,Threats & Countermeasures.(Part-I)

Monday, August 09, 2010
What is an Autorun.inf ?

It is just an instruction file which tells the operating system what executable file to use,commands and other programs to launch automatically.Actually it is not a virus but i will show you how it can be used to run malware/virus codes.A autorun.inf  can be opened  with a text file format and i will show you how to edit it.
What is an Autorun.inf
 Threats imposed by Autorun.inf :

As i said before that it is not a virus but it can be used to execute virus code/malware,I will explain this through a simple example below.
[autorun]
open=Viruscode.bat----------(1)
icon=Viruscode.ico
[autorun.mips]
open=filename2.exe----------(2)
icon=filename2.ico
[autorun.alpha]
open=filename3.exe----------(3)
icon=filename3.ico
a)In the above examples you can see  the first "open=" is assigned to a ".bat" file,by batch programming a killer virus can be made and put in the same folder containing the autorun.inf so it can be executed automatically.Suppose the autorun.inf in there in the USB,when the USB is plugged in then the autorun.inf file will launch the ".bat" file there by the commands in the ".bat" file get executed.
 c:\windows\system32\shutdown -s -f
The above code can be copied to a text file and saved as ".bat" extension,when executed it will shutdown the PC forcefully.It is just a simple example with batch file more extensive damage can be done with it.

b)The filename2.exe can also be a Trojan/Keylogger.

c)The filename3.exe can be a exploit for the vulnerabilty of the system.

Autorun Disabling:

One of the secured way is to disable the autorun option in Windows xp,Vista.For doing that you have to install the corresponding patch/update file from windows.
-Update for Windows XP (KB967715)(DOWNLOAD)

-Update for Windows XP x64 Edition (KB967715)(DOWNLOAD)

-Update for Windows 2000 (KB967715)(DOWNLOAD)

- Windows Vista must have 950582 update.
We will use the registry edit to disable Autorun option.

For Vista and  Xp,this method is used to disable autorun feature in all the drives.
 Note:Click on the images to zoom them.
1)Click Start & type Gpedit.msc in"run" for Xp and in "start search box" for Vista and follow the instruction as shown in the image below.

2)After selecting the properties use the "enabled option" and use the appropriate option from the drop down menu as shown in the image below.

3)Now apply and restart the PC,its done after that.


Method 2:
This method has more fuctionality than the previous one as you can disable autorun option for specific drives.

1)Click the start button and type "regedit" in the run box and hit enter.

2)Now search for the following path :
HKEY_CURRENT_USER\SOFTWARE\Microsoft\Windows\CurrentVersion\policies\Explorer\NoDriveTypeAutorun
Now follow the instruction given in the image below.

3)Right click and select modify,put the appropiate hex value as shown in the images below.

4)Use the appropriate Hex value in the Value data space,below the Hexcode and the corresponding function is mentioned.
Image source:Microsoft support.

5)Click ok and restart the PC,its done after that.

Autorun.inf can be removed by Command Prompt and few Tools also.....so visit for the Part-II of this post.

If you find this post worthy to read then do drop a comment...it will be appreciated.

IF YOU LIKED THE CONTENT OF THIS BLOG THEN DO "VOTE" FOR IT........Click here to Vote!
Autorun.inf :Removal,Threats & Countermeasures.(Part-I) Autorun.inf :Removal,Threats & Countermeasures.(Part-I) Reviewed by Satyajit (Admins,a.k.a Satosys) on Monday, August 09, 2010 Rating: 5

How to hack Windows Xp Administrator Password?-(Part -I)

Tuesday, July 06, 2010
The title of this post may appear a noob but today we will try to do it in a different way.One can find many command prompt usage for it in web and many softwares for cracking it.The software i would recommend for doing it are....

1.Ophcrack:It is a windows password cracker implemented on rainbow tables.It is available as a freeware.(DOWNLOAD HERE)

2.Backtrack:It is one of my fav,it is a multi-functionality tool that is used for software cracking,wireless hacking,penetration testing,password cracking..etc.When it boots in one can see a linux based interface and it is typically a GNU/Linux based.It is also a freeware(DOWNLOAD HERE).

Quoting Kevin Mitnik-"I wish i had Backtrack-3 many years ago.It would have saved me lot of time."
 Well,after reading the above quote by the great Kevin you must  have imagined the functionality of backtrack.So,before going into the article  i want you all to go through the Disclaimer.
WE CAN USE THIS METHOD FOR WIN VISTA ALSO
Finally we should start......i should mention that we will hack using Backtrack3......though version 4 is  available and you can use it.

1.I hope you all have downloaded the .iso  file of  Backtrack from the above link(Always use official link).

2.You can  burn it to a  DVD/CD(make bootable) or boot it from USB,i would prefer using USB.

3.For booting it from USB you need to make your USB a booting one,for that you will need  UseNetbootin(DOWNLOAD).....and use the instructions given here.

4.Now i hope you have come up with a bootable  USB with Backtrack loaded in it,now restart your system with USB plugged and then go to the boot menu and select boot from USB....and leave it....you will be guided to the backtrack desktop screen as shown below.

5.Some times you may need Root ...Username:root & Password:toor.

6.Now open up chntpw by clicking on the start button as shown in the image below.

7.Then you all can see a command window will open up....now inorder to proceed you need to know the different partitions in your  harddisk,so for that type "df"(with out quotes)hit enter and it will show different partitions as shown in the image below.

8.Select the partition where the system files are loaded....here in my system it is in "sda1" so i will be using it in my further steps.

9.Now type in  this  chntpw -i /mnt/sda1/WINDOWS/system32/config/SAM  and hit enter.
Note:All the characters in the above command are case sensitive.
 Why we used this command?
Because all the passwords in Windows Xp are stored in SAM file which is located in the above specified location and the SAM file is encrypted  with LM hashes and sometimes a key is provided.

10.In the above image  you can see a question is asked "what to do?"by default it will take "1" if you hit enter...as it denotes "edit user data and password" as you can see in the above list (in image) so,hit enter and the below screen comes up.....

As it has taken "Administrator " as default value as you can see in the above image so again hit enter.

11.Here you can see there are many  options you can choose any one from the list by  typing that and hitting enter.I have chosen  option "1" which says "clear (blank) user password".
Now as you can see the "password cleared !" message has come up so,lets check again.

12.Hit enter again to get  the confirmation message as shown below.
So,the hack is successful!!! as you must have felt that hack using backtrack is purely command based....so remember few commands  and it can work wonders for you.
If  you liked this hack then do drop your comments and  give your suggestions on it they will be appreciated!!!
How to hack Windows Xp Administrator Password?-(Part -I) How to hack Windows Xp Administrator Password?-(Part -I) Reviewed by Satyajit (Admins,a.k.a Satosys) on Tuesday, July 06, 2010 Rating: 5
Powered by Blogger.